Why scans take up so much storage
A scanner captures the page as an image. What you see on a scanned page is a grid of pixels, and a document scan usually has one image per page. Some scanning apps also place an invisible text layer from text recognition (OCR) over it so that the page can be searched. Even then, the visible page image is still a pixel grid. A PDF that you export directly from a word processor, on the other hand, describes the same page with characters, fonts and lines. That is why a four-page letter can be very small as an export, while the same letter as a scan can take up several MB.
How many bytes a scan needs depends mainly on four things:
- Pixel dimensions: width times height in pixels. They result from the paper size and the scan resolution.
- Color: A color scan stores more information per pixel than grayscale, and grayscale in turn stores more than pure black and white.
- Image noise and background: To the compression, paper texture, shadows, creases or a gray haze are real image detail and take up space. Evenly white areas, on the other hand, can be stored very compactly.
- Encoding: which compression method stores the image, and at what quality.
So four pages, a DPI number or the A4 format do not translate into a fixed number of MB per page. Two scans of the same sheet can differ greatly in size depending on the device and settings. Nor does a PDF have a single resolution. Every embedded image has its own pixel dimensions, and one file can mix scanned pages, exported text pages and photos.
How to recognize image pages in your PDF
If your file consists mostly of image pages, most of its bytes are usually in those images. That is exactly where the following sections come in.
Scan sensibly at the source
You have the most influence while the paper is still on the scanner. That is where you determine how many pixels and how much color information are created in the first place. No later compression can bring back detail that was missing at the scanning stage. Conversely, the PDF compressor cannot lower a very high scan resolution afterwards, because it does not change the pixel dimensions of the images.
So choose your settings based on the purpose. What does the recipient need to be able to read, and which details serve as proof? For certificates, attestations or contracts, these are often the smallest numbers, stamps, signatures and seals. They also include information at the page margin, such as page numbers or verification codes.
Should I scan at 300 DPI, or higher and compress later?
For the scanning workflow in Acrobat with adaptive compression, Adobe recommends 300 DPI for color and grayscale and 600 DPI for black and white (Adobe: Settings for scanned PDFs). That is a good starting point for exactly this workflow. It is not a general rule, though, and not a requirement of your recipient. More pixels are only worth it if they make something visible that you need. If the smallest text is already clearly legible at 300 DPI, a higher resolution mainly makes the file larger.
Whether “scan higher and shrink later” works out depends on what you use to shrink the file later. The compressor on this website lowers the JPEG quality of suitable images, not their pixel count. To reduce the pixel count afterwards, you need the scans as individual image files and must limit them when creating the PDF. Otherwise, you have to scan again. The most reliable way to decide is a test. Scan a typical page that has the smallest text at two settings, then compare legibility and file size in bytes.
When can I use grayscale instead of color?
Whenever color on the document does not carry information the recipient needs. However, a blue stamp, a colored signature or color-highlighted fields may be exactly the proof that matters. For uploads to uni-assist, for example, scanned documents must be complete and legible. There, the signature and stamp of the issuing institution, a note that the document was generated automatically, or a verification code can establish the official character of a certificate (uni-assist: Uploading documents, as of: October 2026). Other recipients have their own rules, and their requirements always take precedence.
In scanning, black and white usually means that every pixel is either black or white. That often saves space. However, it can make faint writing, light stamps or fine lines disappear or merge into blotches. You set the color mode on the scanner or in the scanning app. The PDF compressor does not convert color to grayscale.
Margins and cropping
Automatic cropping in scanning apps removes dark edges and the tabletop background. It can also cut off page numbers, verification codes or stamps at the edge of the sheet. Look at every page after cropping. It is better to scan again than to lose a detail that serves as proof.
The same scanned page in four variants
Four PDFs of the same specially created sample page, each set up as a full-page scan in color or grayscale at 150 or 300 PPI. The files were created separately and not compressed with the compressor. Choose a variant and compare it with the reference in color at 300 PPI.
Scroll in either image to move the magnified section. When an image has focus, you can also use the arrow keys, and both images move together.
Color, 150 PPI
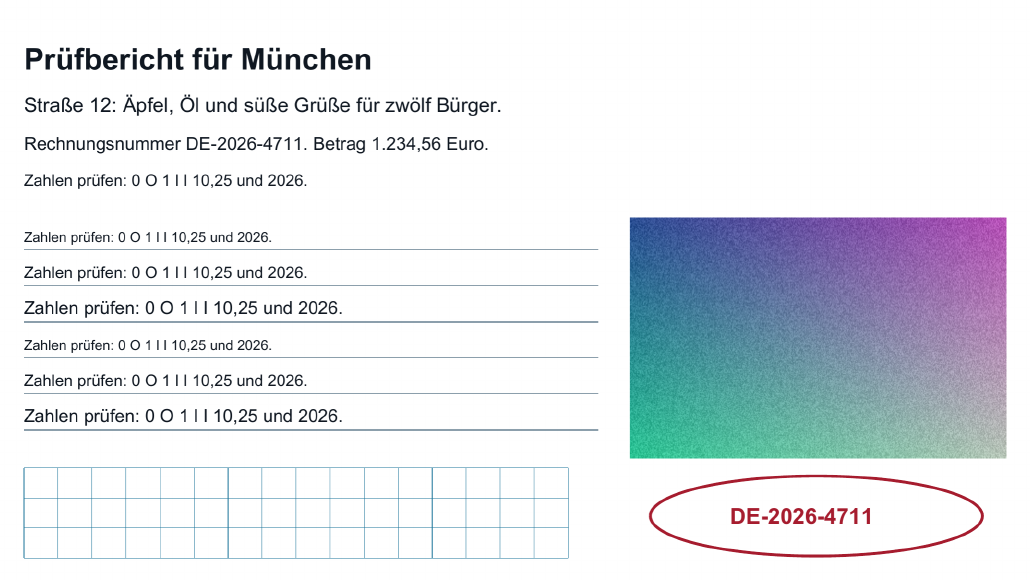
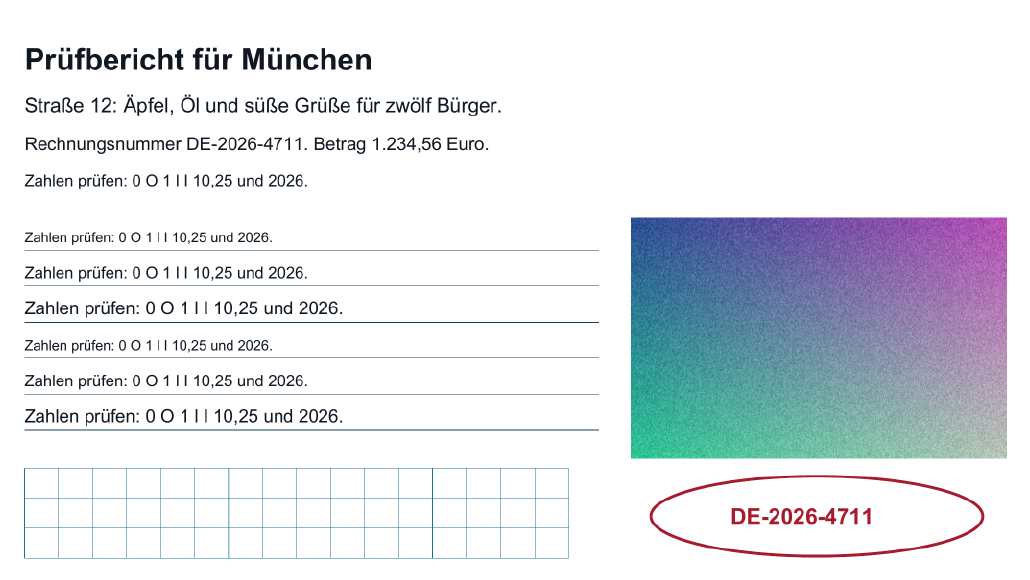
In color like the reference, but at half the resolution in each direction. Pay attention to fine text and edges.
Grayscale, 150 PPI
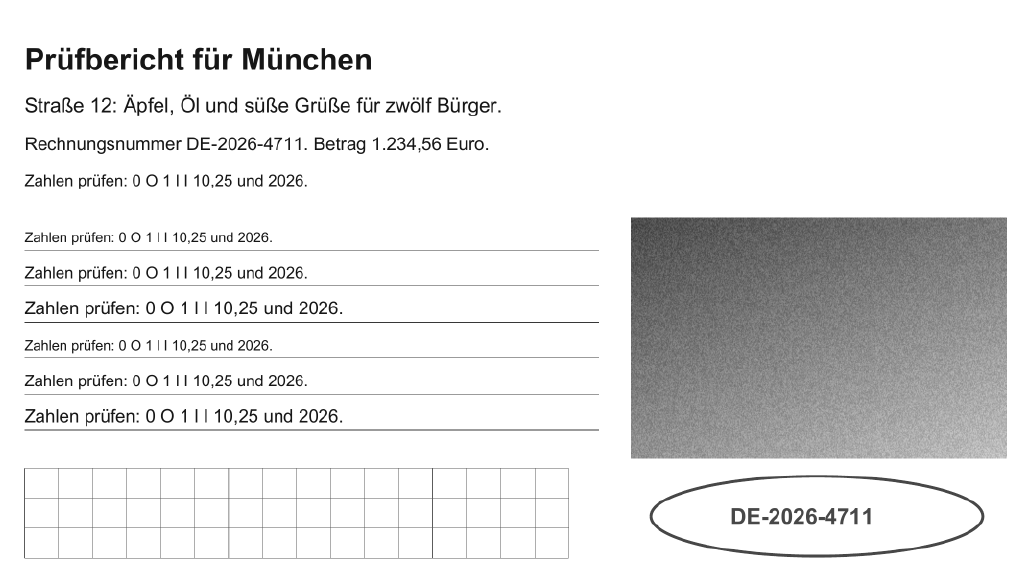
No color and half the resolution in each direction. Check whether everything distinguished by color in the reference is still recognizable.
Color, 300 PPI
Reference for the comparison.
Grayscale, 300 PPI
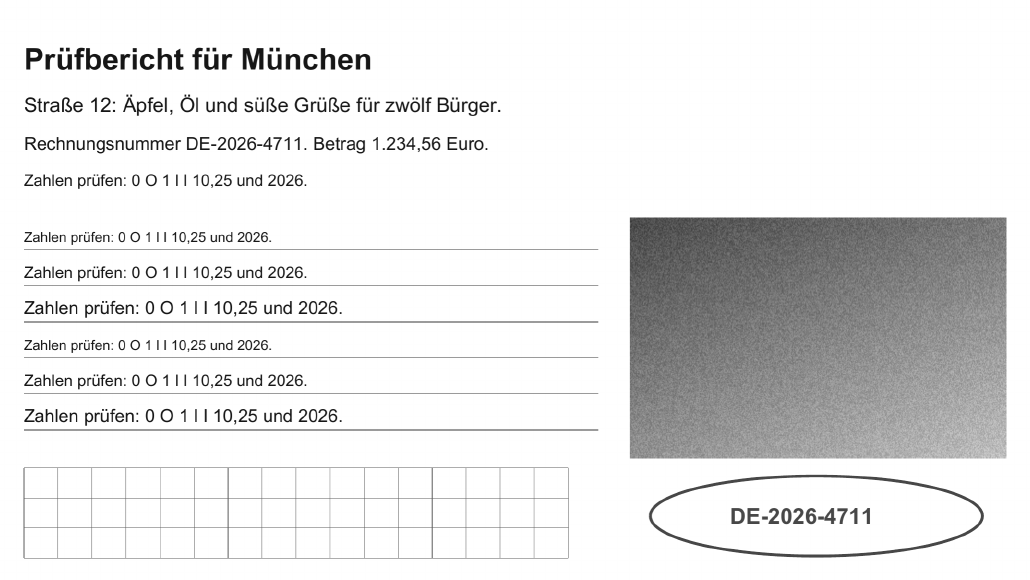
Same resolution as the reference, but without color information.
| Variant | Reference (bytes) | Variant (bytes) |
|---|---|---|
| Color, 150 PPI | 1,233,599 | 352,067 |
| Grayscale, 150 PPI | 1,233,599 | 200,390 |
| Color, 300 PPI | 1,233,599 | 1,233,599 |
| Grayscale, 300 PPI | 1,233,599 | 645,645 |
The same page section in all variants, rasterized from the created PDFs without post-processing.
The example is not a recommendation for any particular resolution or color setting. Even at 300 PPI, not all text is reliably legible, and 150 PPI isn't sufficient everywhere. The size of a compressed PDF can't be predicted from the resolution alone.
Existing PDF or individual images?
Which route fits depends on what you have in front of you. Both tools process your files in the browser, but they change different things:
What the compressor does with a scanned PDF
Under “Method”, you choose between three levels. “Lossless optimization” only reorganizes the file structure and does not intentionally change images. “Balanced” and “Smaller file” also re-encode suitable images as JPEG, and “Smaller file” uses stronger compression. With “Set target size”, you can also specify a limit that the compressor works towards. Every attempt starts from the original, not from the previous result. For the exact quality levels used, see the guide what the three methods change in detail.
Only embedded images that are large enough and in a format the built-in QPDF engine can process are re-encoded. QPDF re-encodes images but does not scale them (QPDF documentation on optimizing file size). So pixel dimensions and the effective resolution on the page stay the same, and you cannot change the DPI of your scan here. Not every scan contains suitable images, and not every scan gets smaller. A result is only accepted if it is actually smaller and passes the checks. Otherwise, you get your original back with 0 bytes saved. The guide PDF won't get smaller explains the possible causes and what to do next.
The compressor accepts PDFs of up to 50 MiB (52,428,800 bytes) per file. It rejects digitally signed, encrypted, password-protected or malformed PDFs. A handwritten signature or a stamp on a scan, by contrast, is simply part of the page image and not an obstacle.
What the route via individual images offers
When converting images to a PDF, you choose between “Keep original format” and “Compress as JPEG”. The JPEG quality can be set from 40 to 100, and the default is 85. With “Limit pixel count”, the images are re-saved as JPEG and their longest edge is reduced to a maximum value, which is 2000 pixels by default. Transparent areas become white in the process. This is where you can actually shrink images that were scanned too large. The source images have their own limits: at most 250 images, each up to 50 MiB and up to 40 million pixels, and at most 100 MiB in total. The finished image PDF may also be up to 100 MiB. That limit applies to the result, not to selecting the file later in the compressor.
Is an existing OCR layer preserved?
Normally, yes. The compressor does not re-rasterize pages. It only changes the encoding of suitable images and the file structure. Text that earlier text recognition placed invisibly over the page image therefore remains part of the page. Still, check the saved file. Search for a word that is definitely in the document, and select a line. The compressor does not perform new text recognition, so a scanned PDF without a text layer still has none after shrinking. If you need searchable text, use a scanning app or a program with an OCR function.
No lossless detour via page images
If your scans only exist as a PDF, you can export the pages as images and build a new PDF from them. However, that is a rebuild. The result consists only of images, any existing text or OCR layer is lost, and every page is rasterized and encoded again. When you use tools one after another, save each result and select the saved file again in the next tool. The limit of 50 MiB per selected file applies there too.
Measure resolution and file size separately
Resolution indicates how many pixels fit on a given length of paper. On the scanner, the setting is usually called DPI. For the resulting image, it means pixels per inch, or PPI. One inch is 25.4 mm. This gives the formula: pixels = length in mm ÷ 25.4 × PPI. For an A4 sheet measuring 210 × 297 mm, the result is:
If you halve the resolution for the same page size, width and height are both halved. The pixel count therefore drops to a quarter: 2,174,960 is exactly a quarter of 8,699,840. The third row shows what the default limit in the image converter does to a 300 PPI scan. 2480 × 3508 pixels become 1414 × 2000 pixels, just under a third of the original pixel count. If this image were printed across the full height of 297 mm, that would correspond to around 171 PPI. On the finished page, however, the actual resolution depends on how large the image appears there, which means on page size and margins. You can try out other sizes and resolutions with the Calculate pixels and print size calculator.
Does half the DPI always make the file four times smaller?
No. The calculation above counts pixels, not bytes. How many bytes the images take up in the PDF depends on how well their content can be compressed. Noise and fine details cost more than even areas, and the compression method does not store every pixel at the same cost. The PDF also contains parts that have nothing to do with the pixel count, such as a text layer, fonts and the file structure. So a quarter of the pixels can result in more or less than a quarter of the bytes.
Only the finished file shows whether a change achieves enough. For this, the compressor shows Original, Result and Saved in bytes, as well as the saving as a percentage. Compare the byte values, because a display rounded to MB can hide small differences. You change the resolution itself on the scanner or when converting individual images. The compressor leaves it unchanged.
Example: A4 and A5 at 150 or 300 PPI
A worked example of how many pixels a paper size needs at a given resolution. The default is A4 portrait at 150 PPI; depending on your selection, it can also show A5, landscape or 300 PPI. The example doesn't change any scan or file. 150 and 300 PPI are example values, not a general recommendation.
Calculate pixels
The rectangle is scaled schematically to fit the available space. It shows neither the actual print size nor a preview of your file. The numbers are what count.
Print size
- Print width
- 21 cm
- Print height
- 29.7 cm
Pixel dimensions
- Pixel width
- 1,240 px
- Pixel height
- 1,754 px
- Resolution across the width
- 149.981 PPI
- Resolution across the height
- 150.005 PPI
- Effective resolution (lower value)
- 149.981 PPI
The width and height resolutions differ by more than 1 percent. That means the aspect ratio of the image doesn't quite match the target size. If you brought the image to exactly these dimensions, it would be distorted.
Pixels are rounded to the nearest whole number. As a result, the resolution on each axis may differ slightly from the target value.
The calculation says nothing about legibility, image quality or the file size of a PDF. A printer's DPI is a separate value and not the same as an image's PPI.
Check the scan and the result thoroughly
A smaller scan is only usable if everything important is still there. Keep your original, and check the saved file, not just the preview. The preview in the compressor shows the original and the result of the same page side by side, and you can page through them one page at a time. However, only the downloaded PDF in your viewer shows whether text remains searchable or links still work.
- Go through every page: Is any back side, attachment or page from the middle missing?
- Look at the margins: Are page numbers, verification codes and information at the edge of the sheet complete?
- Enlarge the smallest text: Do grades, dates, file reference numbers and footnotes remain unambiguous? Watch out for easily confused digits such as 3 and 8 or 1 and 7.
- Check stamps, seals and signatures: Are they recognizable, and is their color preserved if the recipient needs it?
- Check faint areas: Pencil, faded writing and carbon copies must not get lost in blotches or compression artifacts.
- Test text search if the original was searchable: Search for a known word and select a line.
- Compare the size in bytes with the recipient's requirement.
If any area fails, start again from the original. Try a gentler method in the compressor, different settings when converting the images, or a new scan. In the end, the byte count and the legibility of your saved file decide whether the result is right. For details on what to look for in image quality, see the guide Check PDF quality after compressing.